

Greetings, I’m going to get into farming posts more now, with this intro of IMO: perhaps the perfect mix of what alohagambia is supposed to be about: helping with a connection to spirit, love and a lot of dirt. Feel free to ask questions and leave comments below, thank you
——————————————————————-
I learned about natural farming back in Hawaii about 3 years ago. If I had to describe natural farming in a sentence I’d say that its a farming approach that improves crops and soil fertility by using natural materials in your immediate environment while minimizing the amount of unnatural inputs brought onto the farm. I have to first give a shout out and big thanks to some of my mentors and farm gurus from the Big Island; thank you very much to Jim Cain, Ginger John, Bob Shaffer, Drake Weinert and James Rushing for helping me learn and participate with the land more naturally. You guys helped me ‘see’ the land in a different way and made it possible for me to teach others here in Gambia. If you are interested in learning more, these guys are far more knowledgeable than me about farming – check out these sites for further explanations:
http://www.kalapanaorganics.com/natural-farming-with-indigenous-microorganisms/
http://naturalfarminghawaii.net/
After I learned about natural farming I was ‘hooked’ and started to experiment in my own garden and on the lychee farm with Grigor. It worked well and I was having a blast making many strange concoctions, taking over counter space in my kitchen with several glass jars emitting sweet smells. My favorite part of the approach was the combination of science, nature and spirit. Plus, all the people involved in natural farming seem really humble, friendly and very generous.
Fast forward to my Peace Corps application acceptance. I was accepted into PC and I immediately imagined doing natural farming in Gambia. I was so pumped to try and make IMO there and teach people a system of farming that seemed perfect for the environment and resources available.
Below I’ll outline how to make indigenous microorganisms (IMO), pretty much the bread and butter of natural farming and the first soil amendment I made successfully on island and here. There’s 4 steps to make IMO, each taking 1 week, with corresponding titles IMO1-IMO4. The explanations below are brief and slightly different given my location and material available – please research the above sites more on your own or email specific questions to me. Above all, experiment and have fun with the land! Thanks,

First, cook your white rice. Or better yet, get your amazingly capable Gambian counterpart Momodou to make the ‘farm stove’ and cook the rice for you. Thankfully he stepped in so I didn’t hurt myself trying to be that resourceful.

Here’s a close up of that farm stove. Sidepoint: natural farming can pretty much be done anywhere. It doesn’t take fancy equipment or a lot of money to do.

Build your box to hold the rice (preferably out of cedar). Let the rice sit for a few hours till it cools. Fill the box 2/3’s full with rice, leaving 1/3 air space for it to ‘breathe.’ Cover the rice with a permeable layer, such as a paper towel. This permeable layer will let the IMO pass from above onto the rice. Once the rice is in and people are giving you strange looks for wasting food, nail or staple gun some chicken wire on top of the box to keep pests out.

Collect your microorganisms in leaf litter, bark and sticks from surrounding areas. Try to collect them from close to where you’re going to grow things. Look under old silk cotton or mango trees here in the Gambia or Hawaii, maybe a big Oak or fallen log in Michigan. Bamboo also supposedly has great IMO at its base so try to collect there if you have any around. Any old growth forest will provide great IMO.
The idea I was taught is that the forests know how best to take care of themselves and when left alone, drop and decompose and form all their own great growth aids. So, we borrow some of that ancient natural energy to integrate into our own farm systems, staying grateful and saying ‘thank you’ when doing so of course 🙂 Look for the stringy white hyphae, fungus, mycelium etc. on the source material. Place this leaf litter on top of chicken wire on the rice box and cover with plastic to keep rain off of it. Then, place your IMO box under brush out of sunlight for 1 week and wait for IMO1 to happen.
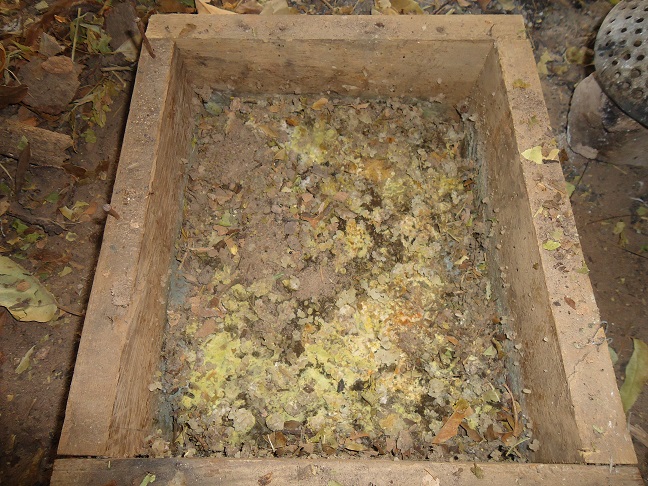
IMO1 is ready. After one week the rice will be really funky as seem above – covered with IMO that have traveled down from the leaf litter you collected, thru the permeable layer (paper towel), and onto the rice. You could say from source material to substrate perhaps. Think of the process of a big transfer of energy, this first transfer from nature to our rice produces IMO1.

Here’s another picture of the rice. You can see how good the rice holds all the IMO from the old trees.

Add equal parts IMO1 (funky rice) and sugar into an earthenware pot (e.g., add 3 cups IMO1 to 3 cups sugar or molasses). You can also use a glass jar. The sugar will ‘feed’ the IMO so to speak. Stir the mixture together thoroughly, out of sunlight. As with the IMO1 box, fill your container 2/3’s full here, leaving 1/3 air for the IMO to get comfortable and breathe. — I’m going to get my natural farming card cut for using white sugar here 😦 — If possible, use all natural brown sugar or molasses to mix with the IMO1/rice. White sugar lacks a lot of vitamins and nutrients that compliment natural processes and IMO growth. Forgive me guys, I’m still hoping for ‘Island Naturals, The Gambia’ to open up here, business project maybe…? Anybody think that I’ll find angelica to make Oriental Herbal Nutrient (OHN) out here!? I wish 🙂

Ok, after stirring together IMO1 and sugar in your container, cover it with breathable top and leave for 1 week in cool dark place. I had to customize the top here to try to prevent pests etc. Most times, a paper towel and rubber band to hold it will be fine.

One week later you have “IMO2” ready. The IMO2 will smell sweet, slightly fermented and full of life. You gotta smell this once in your life, it’s great. I also learned at this point that the processed white sugar would actually work. That was a relief for me that I could make IMO here without the preferred materials. This is also a step that will get you very strange looks from others, not only have you wasted rice at this point but also sugar, leaving it in a pot in the dark for a week, what are you crazy!?

To make IMO3 you’ll need to find wheat mill run, rice mill etc. You’ll need to add the IMO2 (rice & sugar mix) into water and mix that water into the mill to inoculate the pile. This transfers the IMO2 into a new home where it can propagate and also provides you with more usable material. (I also experimented with trying to grow IMO2 on the harder and less permeable rice husks, which didn’t work. You can see the pile of rice husks behind me in the picture. Try small piles of different material to see if IMO2 will ‘take’ to different substrates.) Note: the pile of mill should be outside on top of the dirt. Add a handful or so of IMO2 in a bucket of water (20L here in Gambia using the yellow Bidongs). Mix the liquid into the pile of rice mill till its moist but not damp (i.e. when it forms a ball in your hand that breaks when you tap it). Cover the pile with a breathable cloth (rice bags, sheets, etc.) and leave in a shady place for one week. Important: Check your pile every 1-2 days, it will get extremely hot and needs to breathe and not cook/kill the IMO. Mix the pile to cool it off and provide air then cover it back up.

After one week – remove the cover and find your IMO3 ready! You see here that the white fuzzy hyphae have crawled over the rice mill – a sign that it’s worked and spread throughout the pile. IMO3 smells somewhat yeasty and a bit sweet like fresh bread. Definitely have to smell this once in your life too – mixing or just sitting near the IMO3 pile seems to charge you up with positive energy and life force. When we mixed it here we were always smiling, laughing and making jokes that we were cooking local food or doing some kind of strange magic that people would report us to the village elders for :).
The final step is to add equal parts IMO3 to topsoil. For example, if we had 4 buckets of IMO3 (inoculated rice mill), we would mix in 4 buckets of good top soil and leave that covered for one more week. Making sure to stir it or add water to keep the moisture content correct. I’m not sure if you add more water and IMO2 at this point or just more water, I did add plain water and the pile re-heated / re-awakened. There’s no set rules so just try your own style and have fun.

In the picture above we are using the final IMO4 on half of the garden bed so we can see the difference in growth. IMO4 looks light in color and is more like a powder. Make sure to add your IMO to the soil then cover it up quickly, you don’t want the sun to destroy the microorganisms, which are photosensitive. We have planted an intensive Moringa bed here designed to produce a lot of edible leaves in a small space. Moringa is a great tree for aid and is called “nebadayoo” (think “never die”) in Mandinka. If you’re interested in it, you should google it – it’s really a “miracle tree” as they say

So, when you have IMO4 you’re ready to go. Go add it to your soil and see if it helps. The application rate of IMO is something you can test out too. I’m using between 2-4 ‘pots’ or tomato paste cans here per 3m^2 garden bed and that seems to be helping. In the picture above I’m trying 2 different garden bed preparations to grow the grain Fonio (Mandinka: Findo). http://www.nap.edu/openbook.php?record_id=2305&page=59
And a couple more tests with two different corn beds planted on the same day:

Here are a few corn plants planted without IMO.
I’m trying to show how the IMO helps, rather than just talking about it. ‘Walking the walk’ and showing people seems to be the best way to teach and gauge peoples interest. Especially here in Gambia where language barriers are big, it’s easiest for me to just show two different garden beds in a side by side comparison. Plus, my Mandinka is so bad at this point that I can really only say “Rice under tree, wait 1 week. Sugar, mix. Add in soil. Good soil! Nature fertilizer is good!” Any questions :). Thankfully my counterpart speaks English and several local languages.

And here is the other corn that was planted with IMO. All the corn in this picture and the one above were planted on the same day. I can’t say the IMO caused the difference, but it was the only difference between the beds with respect to sun, water, seed etc. Either way, the corn where the IMO was surprisingly bigger.
So that’s the process to make and use Indigenous Microorganisms (IMO). It’s basically the transfer from IMO from nature into a usable form, fermenting and feeding it along the way. Thanks again for those who helped me learn about natural farming. I’ll try to keep the natural farming posts coming.
Please leave comments and questions below. Thank you for reading and participating with me -stephen

I read your article its very helpful for me to start imo for natural farming.i start my imo already for my garden.
Great! Thank you for the comment. And please feel free to email me if you have any questions. Thanks for checking the blog. -stephen
It’s like kombucha for your soil, which works for our bodies’ beneficial balance of IMOs, so why not make it for our gardens?! It’s the gift that will keep giving. It is literally libations for the ancients among-us. (Forgive me..haha Rhymes with fungus.) Thank you for sharing brother!
You’re welcome, thanks for checking out the blog :), stephen
It’s like kombucha for your soil, which works for our bodies’ beneficial balance of IMOs, so why not make it for our gardens?! It’s the gift that will keep giving. It is literally libations for the ancients among-us. (Forgive me..haha Rhymes with fungus.) Thank you for sharing brother! Keep the Good Going!
Thanks for the step by step guide to making IMO. It’s great seeing people who are actively involved in saving our planet. I Love what you are doing.
I have a question though. The piece of land I’m using for home gardening has lost virtually all its nutrients. if I make IMO4, can I simply add it to the soil or do I have to get fertile top soil from somewhere else to add the IMO4 to before adding it to my home soil?
Rich,
Thank you for checking the blog and kind words – helps to get some encouragement and stay on the path of helping. I’ll keep it up.
Regarding the IMO4 I’d say definitely add it with the soil you have at your current site. Although your topsoil is not fertile it still contains its own set of microorganisms that need to meet and mingle with the new ones you’ve cultivated. Also, i have to play devils advocate and ask “how do you know your soil has lost all its nutrients?” This would be a good time to do a cheap soil test, find a university that can do one for free or get an inexpensive kit. I bet you’ve got some good stuff going on in there; also keep in mind that structure is arguably more important than mineral levels so keep your compost piles rocking and add some coarser material, or biochar, or big root crops. Ok, let me know if you have any other questions, thanks again, -stephen
Thanks a lot for the quick reply.
Please let me ask a few more questions:
1. What inexpensive equipment would you recommend for soil test as soil test in a university here us about $10?
2. What simple method do you use for making compost?
3. What is biochar?
Thank you again. I await your response soon.
Best regards
Rich
hey rich, did i answer these questions yet? i have blog post about biochar that will explain your 3rd question.
hello Snfilipiak,
Yeah you have replied my questions. But please drop the blogspot link for the biochar for me.
Many thanks.
Rich
https://alohagambia.wordpress.com/2014/05/23/upcycle-burns-carbonized-rice-husks-crh/
Hello,
Thank you so much for your reply.
hey rich, try this link for the biochar:
https://alohagambia.wordpress.com/2014/05/23/upcycle-burns-carbonized-rice-husks-crh/
stephen
Thank you for sharing this, so practical and you have made it very easy to make.
Thank you Rich Adeyemi for directing me to this post
OS, you are welcomed. I hope you find the blog really helpful.
Hey Rich,
Yea no problem on the reply – i can usually get to them in a week or so, sorry this time took me a little longer. let me answer your ?’s in order:
1. If the soil test for you is only $10 it would be worth doing it, you’ll probably save that money down the road through a better informed approach, ie. not blindly buying fertilizer or amendments that you dont need. If you dont want to spend any money you can check the sand/silt/clay content of the soil by doing a ‘jar test.’ Its basically adding a few inches of soil to a jar, adding water, little bit of soap, then shaking it up and seeing the 3 distinct layers separate. Search online theres some better instructions out there. Start with that and then start making compost, thats the easy/free approach.
2. Compost is as easy as piling all your left over kitchen scraps (no dairy, meat, raw eggs etc.) in a pile and cover it with grass clippings, paper shreddings, leaves etc. and keeping it moist. That’s the easy low work approach and you can get into more complexity with containers or straw bales or pallets from there. You basically stack brown carbon material, then green/veg scrap nitrogen material and a little dirt to top it off. Keep repeating this layers and build your layer compost – e.g. 5″ carbon, 1-2″ nitrogen, 1/2″ dirt.
3. Biochar – this is charcoal used in agriculture to help retain water, increase microbial activity and provide structure to soil. It lasts for a very long time and is a really great thing for the soil, especially if you can ‘activate’ it before by running it through a compost pile or manure tea etc.
Ok, ciao for now -stephen
Hello Stephen,
Thanks so much for making out time to respond to my mail. I really appreciate.
I’m already doing compost using both container and pallet. It’s my first time and I think it’s cooking greatly.
I’ll keep you posted on my results. You have been a source of inspiration and encouragement.
Gracias!
Yo, good to hear about the compost! Yea keep an eye on it, it’s really cool to see it heat up and cook down. Keep it up, buena suerte!
i have enjoyed and learn your literature, am able to put it into practice now.
am also a student doing agriculture.
Great, thanks for the comment.
How much is the crude protein for the IMO3 sir? I have my practice now as an additives for the swine raising.
hey charlene, do you mean how much rice mill to make imo3? you can use any amount, but maybe atleast 25lbs so you have enough material to work a larger garden/farm space. i found my rice mill in 50-100lb bags.
thanks steve,am in uganda doing organic farming producing fruits and vegetables.I must say ur a very humbe good teacher and am in love with ur illustrations and detail.I will be glad to follow ur updates tank you big
Bernard, thank you for the kind words, they’re inspiring me to keep blogging and trying to help. Feel free to ask any questions. And keep up the good work there in Uganda 🙂
Thanks a lot for all this great information on your blog. I’ll definitely got to try this as well asap. Was finding your blog around 2 years ago and was impressed of your work hence we are here in the Gambia and also work on a plot of land according to permaculture principles and try to turn it into a fertile food-forrest. You are a real inspiration and was able to git many good advice from your shared experiences. Keep the goid work up. By the way; Are you still around sometimes?
Patrick, thanks for the kind words, glad i was able to inspire you. I’m not around Gambia anymore, only in spirit, i know live in Hawaii. But feel free to reach out anytime and ask any questions or brainstorm with me, i still want to support my people there and that can be done through people like you that are still making a difference on the grassroots level there. -stephen
thanks for your guide but i expected you to tell us how imo can be used in livestock production.
Thank you for a wonderful post. I have a question for the IMO3 stage. Do you use cooked or uncooked what mill run, rice run etc?
Hey WT, yea thanks for checking out the blog. For the IMO3 just use uncooked wheat mill run or rice bran. Some bulk food supply stores will probably have it for ya.